Saturday, 30 August 2008

Magical Christmas Card

As a child I loved the magical idea of Rudolph and the other reindeer flying through the sky pulling Santa's sleigh. I think that's why I love this magical stamp from Elusive Images. It's part of the Christmas Fusion Themeplate.

To make this card I first made a background with shimmery blue Glimmer Mists which I covered with clear UTEE and stamped "Rudolph" into it using Encore Metallic Silver ink. Finally I gave him a lovely red nose with a tiny spot of Christmas Red Stickles Glitter.

The backing paper is from the Artylicious Season's Greetings CD. It's actually a very plain paper with just a very soft graduated shading on it, but I used another stamp from the Christmas Fusion Themeplate and some more of the Encore silver ink to stamp that lovely star flourish all over it.

Finally I assmebled my card, staying with the "star" theme by using some star effect holographic card to layer with and by adding a few faux gems in the shapes of stars to the card.

This card is my card for August's "Fab's Big Christmas Challenge" - I don't think I am going to do the nutter's challenge this month - it's EIGHT cards before the 25th of September, but we shall see, maybe I will find enough time this month!

Thursday, 28 August 2008

Blog Candy from Glenda Waterworth

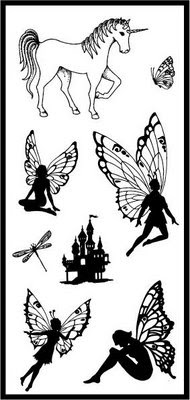
OH MY GOODNESS, I am one of the lucky people chosen to help Glenda give away some of her fabulous new faery stamps! Here it is, the delightful "Dragonfly Faeries" themeplate. To win this magical collection of stamps all you need to do is leave a comment here - the winner will be chosen by a random number generator. Then why not visit Glenda's blog to see the other beautiful Faery stamps and find a list of her blog readers - that list may just help you find the other Faery themeplates! To get to Glenda's blog just click on the picture of the Dragonfly Faeries themeplate and by faery magic you will be taken there ...

OK it's not magic, it's the wonders of modern technology and the world wide web, but hey that spoils the magical mood.


The competition closes at Midnight on Saturday, 6th September 2008, so be sure to leave a comment before then.

Saturday, 23 August 2008

Another "Messy Rabbit" Stamp for Christmas

I like this little snow covered house. It's part of the "Messy Rabbit" series of stamps from Joanna Sheen, but while you can use it along with the rabbit images, it stands up all on it's own to make a simple but fun Christmas Card.

Here I have stamped the house, water coloured it and then used coloured Sakura Glaze pens to make the Christmas lights around the roof of the house stand out and the clear glaze pen on the windows so they appear to have glass in them. Finally I added some "Snow Writer" from DecorArt to all the parts of the image where there was snow and sprinkled that with Crystal glitter.

The backing paper is from my Artylicious "Season's Greetings" CD, and the Sentiment stamp is a little cheap one I got in one of those bargain tubs you see in craft shops. Sorry about the photo, it's just not doing the card justice. Anyhow that's another one for Fab's Big Christmas Challenge this month.... only 2 more to go before Monday!

Friday, 22 August 2008

Getting on with Christmas Card Making

It was easy to get motivated for Christmas card making yesterday after the postman deivered my new stamps from Joanna Sheen. She has a very cute new range of stamps called "Messy Rabbit". I used the a stamp from the plate called "Baggy Jumper" which I stamped in Black Stazon then coloured with Prismacolour Pencils and belended with artist's low odour white spirit.

The finished image was mounted onto papers from a Crafter's Companion CD and some blue Mirri card and a little bow was added for a finishing touch. The sentiment comes from a little set of clear text message stamps which hubby bought for me from a local craft shop - not sure what make they are but the tiny text is often quite useful.

This makes a total of 4 cards made for this months "nutter's challenge" on Fab's big Christmas Challenge - 3 more to go before the 25th, I guess I had better get a move on!

Thursday, 21 August 2008

Florrie's Weekly ATC Challenge - Trees

The theme this week on this challenge hosted by Craft Swap forum is Trees, and I guess the awful weather we are having has got me in autumnal mode already! I made my ATC using various inks in yellows, orange, green, russet with a tiny amount of pink to create a background that would create an autumn feel then inked up my tree stamps from The Angel Company in autumn colours using Stampin' Up marker pens and stamped them onto my background. Once the trees were in place I sponged on some more brown inks to ground the trees. Finally I added a leaf from a set of clear stamps purchsed in The Stationary Box which I heat embossed with copper EP and some pretty cabochon gems that match the colours in the ATC.

Wednesday, 20 August 2008

Bling!

I got a bit carried away with the sparkle perhaps, but what the heck, I had fun making this card for a swap where the theme was to colour in something on your card. I decided it would be fun to stamp and heat emboss one of the big flowers from Elusive Images themeplate onto silver foil card and then colour it in with Sakura Glaze pens, which allow the silver foil to gleam through. I think the name of the themeplate "Diamante Delight" got stuck in my head because once the flower was ready I could not resist adding a ring crystal gems around the inner part. I think there must be close to 40 little gems on it despite the fact it was already sparkling due to being embossed with Stampin' Stuff's "Disco Black" EP which is a holographic powder.

Next I stamped and embossed a stem element and a double flourish from the Diamante Delight themplate onto some green card using the same black holographic EP. This was layered onto some black card and more sparkle was added by appying a thin layer of Stickles "Star Dust" glitter glue to the revealed edges of the black card. Finally I attached my cut out flower to the top of the stem.

With my flower ready to mount onto a card, I made some backing paper by sponging some cerise and purple inks from a Kaliedacolor Inkpad onto a pale lilac paper and then stamped the flourish stamp into diagonally opposing corners and extended this along the top and bottom edges. The paper was then applied to black card and my flower was mounted on top with foam pads. So much sparkle made this a tricky card to get a photograph of but I think the one I did manage to get shows the card reasonably well.

Aw, thank you Sandra and Rachel


Apparently I am a "Wilde Woman", my freind Rachel has given me an award to say so!
The rules for this are award are:

1. You can give it to one or one hundred or any number in between - it's up to you. Make sure you link to their site in your post.
2. Link back to this blogsite so Tammy can go visit all these wonderful women and remember the Purpose of the Award is to send love and acknowledgment to women who brighten your day, teach you new things and live their lives fully with generosity and joy.

I am going to pass this on to Jenny who does not publish so much work but when she does always publishes wonderful things.

And another

Not only am I a Wilde Woman, but Sandra who designs stamps for Kadoodle has very kindly given me this. If you have not seen Sandra's stamp designs then pay a visit to her blog or to the Kadoodle Stamps Blog.

The rules for this award are :
The rules of the award are :-
1,The winner can put the logo on her blog.

2,Link to the person you received your award from.
3,Nominate at least 7 other blogs.
4,Put links of those blogs on yours.
5,Leave a message on the blogs of the girls or boys you’ve nominated.

There are so many fab bloggers out there who's blogs I visit so I will have to think a bit about who to pass this onto.

Monday, 18 August 2008

Stampbord Challenge Card

This card was made for a challenge on Glenda Waterworth's blog. The challenge was to use stampbord on a project along with Elusive Images Stamps. It took me a while to decide which stamps I would use for this challenge as so many of the Elusive Image designs work beautifully on Stampbord, but finally I settled on stamps from the new Fantasy Floral Themeplate which has been designed to co-ordinate with the paper designs on the Artylicious CD of the same name. It was quite a tricky piece to photograph due to the light reflecting off the UTEE on the stampboard, but the close up shot shows the stambord more clearly.

First I coloured my stampbord piece with inks from a Petal Point Fluid Chalk ink pad, then stamped my image on top of that using black Archival Ink. Next I scratched off some of the colour from the stampbord to highlight the flowers and some of the leaves. Finally I edged the piece with a gold Sakura Pentouch pen and coated the surface with a couple of layers of UTEE to give a glossy enamelled look to the finished piece.

Next I chose one of the co-ordinating papers from the CD and also some card stock in colours that would match those in the printed paper and in the stampbord peice. My green card stock was a little too pale so I sponged on some of the same green ink I had been using on the stampbord to get the shade I wanted. I cut out my square of floral paper from the printed sheet and cut an X shape in the center to allow me to roll back the flaps and create a frame for my stampbord to sit in. Before rolling back the flaps I inked the reverse side of the paper in some of the terracotta ink I had used on the stampbord so as the rolled back flaps would not show bright as white.

Next I took a small leafy spray from the same set of stamps and created borders at the top and bottom of my green card by stamping with versamark and heat embossing with copper EP. The last step was to assemble all of my elements and to add the organza bow. The bow is kind of crinkly because I heated quicky with my heat tool. This makes the organza shrivel a bit and creates an interesting effect, but if you try it be careful because if you heat too much holes will start to form in the ribbon.

Friday, 15 August 2008

Pop-Up Card

This card was made for a challenge swap, the challenge was to make a pop-up card. As soon as I signed up to join the swap I knew I wanted to use my set of cute doggy stamps from The Angel Company and make a 3D scene with them.

First I stamped the dog, his kennel and the little grass stamp with black Stazon. I coloured the images with Prismacolor Pencils, using low odour white spirit and paper stumps to blend the colours and then cut this out. With my pop-up element made the next job was to cut a liner for the inside of my card. This would become both the mechanism for my pop-up and also the background scene.

Next I measured the height and width of my cut out images and made the corresponding cuts and scores in my liner to enable me to fold the mechanism and then coloured my background by masking off areas and sponging on some Adirondack Dye inks for the hills and sky. The sun was also masked and then colour sponged on using Distress Ink and some light orange from a Kaleidacolour ink pad over the yellow Distress Ink to give it a little more "heat". Finally I took some Tree stamps from another The Angel Company set and stamped in my trees using more Distress Ink.

The front of the outer card has been decorated with papers from the Artylicious Butterfly Bliss CD and stamped with a text stamp from the same set of stamps I used for the pop-up images. However, while the little dog on the outside is also from The Angel Company, he is not part of the set I had been using for the inside of the card. I also use one of the inserts from the Butterfly Bliss CD to line the facing side of my liner (the bit where you would write your message to the receipient of the card).

With this all done the last step was to adhere the inner pop-up part of the card to the outer card and then mount my pop-up element onto the mechanism. There was quite a lot of work in this card, but I think the end result is worth the effort.

Thursday, 14 August 2008

Blog Comment form and Gimme an Inch....

... well 4 inchies actually! Oh boy am I late with this swap - sorry Jan.
This is my second attempt at inchies and I still think they are tough little devils to make. The swap was to make 8 and to make 2 of each so that we could swap one set and keep one. With the eight swaps we receive we will have sixteen inchies to then use in a project of our own devising.

I started with one theme in mind, using images of ladies, but half way through it dawned on me that my 4 beauties were very seasonal and it would be fun to make a corresponding inchie to match each season, Spring, Summer, Autumn and Winter. Now I was on holiday when this idea struck so it had to wait till I got home, and the mammoth craft room tidy up had to be done first.. oh well enough of the excuses I finally got my other 4 inchies finished so here are my Four Seasons inchies.

The bevy of beauties are all taken from the Garden Themplate from The Artistic Stamper which was stamped in Black Stazon then watercoloured. The complimentary inchies are stamped onto backgrounds made with Glimmer Mists using various stamps or elements from a stamp as follows : Spring - Stamp by Personal Impressions; Summer - Stamp by Elusive Images, the Just Butterflies Themeplate; Autumn - stamp from a set of clear stamps origin unknown; Winter - stamp from a Stamp Tapestry set.

Blog Comments Form
For those of you who are kind enough to take some time to leave me a comment I hope you will agree with the change I have made. For myself I find when I visit other blogs I am preferring the option where the comments open in a seperate pop-up window so I thought I would change to that setting here. Feel free to say if you prefer it the other way round.